


How to Transform Your RV Shower with Countertop Paint
- rvfamilyreno8
- Oct 27, 2022
- 4 min read
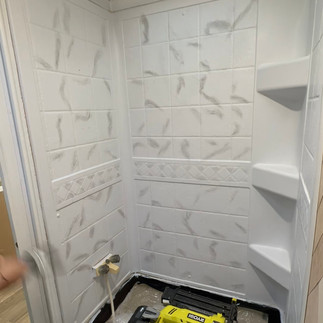
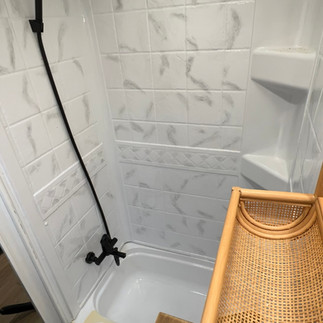
I painted the kitchen countertops in this recent RV Renovation, and had so much left over paint. It got my wheels turning and I thought, "Let's paint the shower surround!!" So I did, and the results are INCREDIBLE!
BEFORE AFTER

Here I will share the steps I took and the products I used. I used the exact same steps that are detailed on the directions that come with the paint kit, so following those steps will give you these results, but since this kit is meant for a countertop, I had to make a few tweaks to make this work for a vertical surface. Okay, here we go!!
Products:
Giani Marble Epoxy Countertop Paint Kit (For the Surround) *Amazon Affiliate Link
Topside Marine Paint (For the Tub)
All the items you need for this come in the Paint Kit, except painters tape.


Step 1: Prep the Surface
I cleaned the shower surround with a Brillo Pad multiple times, making sure to rinse off the cleaner very, very well. After I cleaned, I rinsed with more water, and dried with a microfiber cloth to get as much fuzzies and debris off as possible. Then I let the surround fully dry, about 2 hours.
Step 2: Tape off the Tub
You're going to be pouring epoxy on the walls in a later step, so you need to completely tape off the tub so that nothing will drip into the tub. I did a large layer of tape around the top of the tub, laid a tarp on top, and then taped the tarp down to my initial later of tape.
Step 3: Prime the Surround
In your paint kit you will receive primer and a fabric roller. I applied 3 coats of the white primer, letting it dry 4 hours in between coats. I rolled thin coats to let it fully dry and not drip on the vertical surface.


Step 4: Paint on the Marble Veining
In your kit, you will get some gray paint and a detail brush. I used this to draw in my marble veins. Again, the details in the directions that come with the kit are VERY detailed, and their website has a lot of sample veining. I actually just followed the veining on the surround because it was already detailed in the texture of the surround, but you could really put it anywhere you want.
Step 5: Spray Water and Fluff
The kit comes with a spray bottle that I used to apply some water and a larger brush that I used to fluff out the marble veins. This makes them more subtle and more natural looking.
Step 6: Apply on the Entire Surround
I put this on all the "tiles" in the surround and then I painted some of the tiles in the middle "border" grey, to tie it all together. Then I let it dry overnight. If you mess up a vein, or stand back and don't like it, just spray more water, wipe it away, and try again.

Step 7: Applying the Epoxy
Unfortunately, I don't have a video of me applying the epoxy because I had to work so quickly, you only get 30 minutes before it starts to set after your apply the activator! I started at the top of the surround, and poured some of the epoxy out straight from the can. I let it drip down and then I used a foam roller that comes with the kit to smooth it all out. For the kitchen countertops, I set it on thick to create a thick coat. I couldn't do that in the shower because it would have created awful drips, so I decided to try 1 thin coat and see what happened. I continued pouring little bits from the can, and then smoothing it out all over the surround using the roller. This would have probably been way easier with a roller tray, but I didn't have a clean one. Once I had 1 thin coat on, I let it dry for 24 hours. I came back to check, thinking I would need another coat, and I totally did not! The one coat of epoxy is so shiny and durable!


Step 8: Cleaning the Tub
Then it was time to take care of the tub. I cleaned it also with a Brillo pad, many passes, many rinses. Then I let the tub dry completely, probably 2-3 hours. I also scraped out all the silicone in between the tub and shower surround.
Step 9: Painting the Tub
I didn't want to do the epoxy kit in the tub because I thought it would be too slippery, so I opted for Topside Marine Paint. Most RV tubs are ABS plastic, which can be used with this paint. I started with a roller, but this paint was pretty thick and wasn't going on nicely with the roller, so I switched to a brush. This paint is self leveling, so the brush strokes literally disappeared in minutes. The paint also smells SO bad, so make sure to wear a respirator and keep the room well ventilated. I did one coat of paint, let it dry for 24 hours, and then applied another coat.
I can NOT believe how amazing this Topside paint was. I have used a tub and tile kit before and this Topside paint is so much better in my opinion. It dried in a hard, coated surface and made such a transformation.
Step 10: Silicone between the Tub and Surround
Since I pulled all the silicone out, I need to add it back in to make sure no water gets behind the tub or surround. I also re-caulked the outside edges of the shower surround while I was at it.

And that's how this painted shower transformation took this bathroom from drab to FAB!
I'd love to see you try this!!
Happy Renovating :)
-Rachel


Would you recommend using the marine paint on the surround? I just want everything to be white. Thanks!